There’s no doubt that data is becoming a bigger and bigger part of our lives. It’s easier than ever to get access to information you previously had to visit a medical or lab setting to obtain. From quantifying the number of steps you take in a day to tracking your heart rate, health data is at our fingertips and ready to help us optimize our lives.
The sports world is, and has been, going through the same data revolution.
It’s not as prominent as the activity trackers on everyone’s wrist, but professional and amateur athletes alike are witnessing their sports being revolutionized by biomechanical optimization.
The ability to track movement patterns, muscle activation, joint angles, forces, and myriad other data points allows sports professionals to create a normative database of “best practices” in different types of movement.
Understanding movement patterns in different sports not only illuminates common mechanisms of injury, but it allows us to study what separates the average from the elite. Essentially, biomechanic profiles set coaches and trainers up to reduce injury and create better, more efficient athletes.
Hockey is absolutely no exception, though it’s lagging behind a little.
Biomechanics and Hockey: A Difficult Pairing
As a sport increases in difficulty and complexity, so does its analysis. Ultimately, the questions being asked are the same: how do I get better, and how do I avoid injury? For hockey, this roughly translates to: “How do I skate faster?” and “How do I avoid common hockey injuries?”
When you pinpoint the questions, it illuminates the biggest sticking point to capturing valuable data on hockey biomechanics: skating on ice.
After addressing the limitations of current biomechanic data as it relates to hockey, this article will use current data to outline the mechanics of a hockey stride and how it relates to speed and injury prevention.
Unique Challenges in Hockey Analysis
Movement analysis for most sports is done with an array of high-speed cameras, reflective motion capture markers, and force plates in a specialized testing center. This works because most sports are land-based, and jumping, cutting, and running are similar in the lab and on the field of play.
Ice hockey, though, has no true off-ice equivalent. Since it involves ice, skates, and a period of gliding, it becomes very difficult to emulate in a meaningful way. There is a significant degree of separation between lab testing and on-ice testing, making the data less valuable.
Land-based training can certainly translate to on-ice gains, but the initial baseline capture won’t be accurate without true skating conditions.
Hockey-Specific Biomechanic Research to Date
Due to the difficulty in testing skating mechanics on ice, there have been a very limited number of studies done to demonstrate normative movement patterns for hockey skating.
Recently, mobile advancements in biomechanics technology has allowed science to step onto the ice and capture accurate data on skating mechanics. Previously, studies were done via cameras only. Now, inertial measurement units (IMUs) allow researchers to test and capture joint angle measurements, acceleration data, and muscle activation patterns during skating itself.
Although there haven’t been many researchers to tackle the question of how to skate faster, Pearsall et al, in their Three-Dimensional Kinematics of the Lower Limbs During Forward Ice Hockey Skating, addressed faster skating mechanics by comparing high-caliber and low-caliber skaters. The following sections will draw on Pearsall’s research and findings.
The Mechanics of an Ice Hockey Skating Stride:
To understand where a hockey player gets their power (and thus their speed), as well as where injury might strike, you first have you understand how a skating stride breaks down.
Throughout an ice hockey skating stride, the player will have periods of both double and single leg support. They’ll also move through gliding, forceful acceleration, and propulsion.
For the purpose of a more straightforward analysis, this article will examine skating mechanics during maximal propulsion and skating speed. The initial 3-4 hockey strides used to accelerate and gain speed are mechanically vastly different from the stride used at top speed. The first 3-4 strides more closely mimic running movements, are shorter in length, and involve digging into the ice for power, whereas the strides at top speed involve gliding and longer stride lengths.
There are 5 main phases of a hockey stride:
- Initial skate contact
- Single support gliding
- Single support propulsion
- Terminal Stride (last point of skate contact)
- Recovery (swing phase)
Let’s look at each phase of the hockey skating stride through the lens of what high-caliber skaters do compared to their less speedy counterparts.
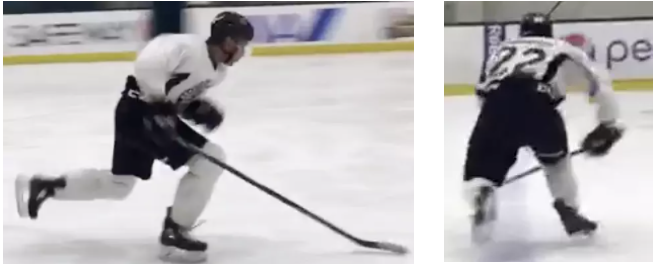
Initial Contact
Initial contact is the first moment of contact between the leading skate and the ice. Although this is a brief phase of the skating stride, it serves as the set-up for the remaining phases. Proper alignment is the key parameter to focus on during initial weight acceptance.

The skate blade should be pointing directly forward or be slightly turned outwards, and the knee should be in alignment with the skate. If the knee is significantly angled inward, it will place greater pressure on the knee, hip, and groin. This increases the risk of injury for the entire lower extremity. Additionally, it will increase the time it takes to get from initial contact to terminal stride, resulting in an overall slower skating speed.
During this phase, faster skaters demonstrate greater hip and knee flexion (bend) at skate touch down. Being more bent into these two joints creates a “pre-loading” of the quadriceps and gluteal tissues, providing greater opportunity for acceleration and power generation in later skating phases. Think of it like compressing a spring – at some point, the tension loaded into the muscle will have to release.
Faster skaters will also demonstrate a larger forward trunk lean. Bringing their chest over their knees increases activation through the glutes, which is another opportunity for power.
Finally, faster skaters show more ankle dorsiflexion (the angle between the top of the foot and the shin) and a more forward-inclined shin at contact. These angles are, in part, influenced by the amount of hip and knee bend as well as trunk lean. Can you imagine having a forward-inclined shin without more knee bend? It would make for some pretty silly skating form.
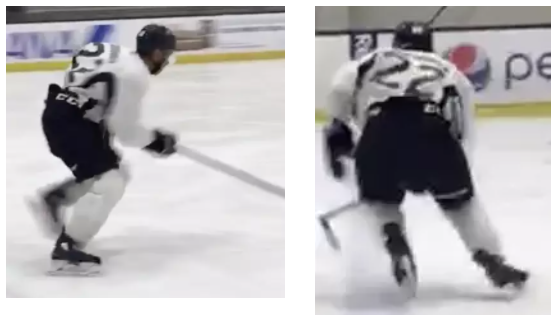
Single Support Gliding
The goal of this skating phase is to provide a stable base and foundation so the swing leg can move forward without extraneous movements. This conserves energy for generating greater speed and power.
During gliding, a skater should begin to turn the skate outwards to set-up the next stride phase (propulsion). Here, the knee should follow the movement of the skate and begin to externally rotate (or turn out) as well.
Throughout the phase, the trunk will begin to de-rotate in this phase in preparation for power generation. The skater should maintain a forward-leaning trunk posture with the chest over the knees. The knee should maintain the same amount of bend throughout this phase – this perpetuates the loading phase started in initial contact. The skater is continuing to store energy in the quadriceps and hip to release during propulsion.
Here, faster skaters show greater external rotation of the of the hip while maintaining proper alignment of the knee over the toes. They also maintain their hip and knee flexion and forward trunk lean for energy storage.
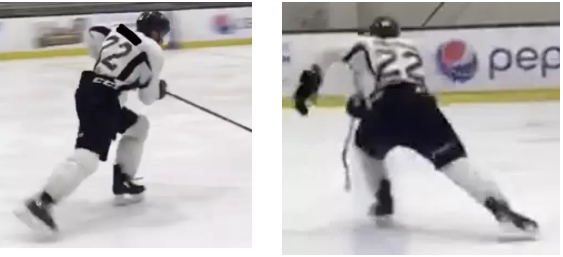
Single Support Propulsion
This phase of skating has the most impact on overall skating speed. During this phase, the skater can generate the greatest amount of muscular power and acceleration. It is critical to have proper biomechanics in order to utilize that power to optimal benefit.
At the foot and ankle, the skater will continue turning the skate outwards to maximize push through the inside skate edge. As the skate turns outward, the skater should forcefully externally rotate and abduct the leg (move it away from the midline of the body). This maximizes activation and power generation through the gluteus maximus and medius muscles. Basically, the knee should turn outwards and move away from the center of the skater’s body in a 45-degree direction.
As the leg moves backwards, skaters should forcefully extend their knee and hip to maximize quad and glute power. Contracting these muscle groups together can generate an incredible amount of muscular power. During this phase, skaters will reach maximal hip abduction and rotation (the “out and back” leg position).
During propulsion, faster skaters will maintain greater bend at the knee and hip for longer. This allows maximal loading of the leg muscles (as previously referenced) prior to power generation (the contraction through the quads and glutes, among others). Maintaining this bend also results in a faster, more explosive transition from a flexed posture to full leg extension, which drastically increases skating speed.
Faster skaters will also demonstrate greater stride width and length. Here, as faster skaters externally rotate their hip and foot to dig in their inside edge, it will create a wider stride that allows additional power during push off (and therefore, more distance covered).
Terminal Stride
During the final point of skate contact, skaters should be in a “triple extension” posture. Triple extension refers to full extension of the hip, knee, and ankle. The more extension achieved, the longer the stride and the more propulsion gained. Skaters should focus on driving through their leg to get the most extension possible.
It naturally follows, then, that at the terminal stride phase, faster skaters have greater hip extension, knee extension, and push-off through the toe.
Recovery
Though it’s called the “recovery” phase, it’s actually more preparatory. Most of the necessary alignment is set up through initial contact and single support gliding, and single support propulsion accounts for the power and speed generated through the stride. Recovery sets the skater up to do it all again.

During the recovery phase, the skater must recover the skate to a neutral position under their body. This sets up for an initial contact phase that is inline with the body before starter turnout, allowing the skater to leverage more of the power generated through the glutes. It also enables a longer push off distance and helps prevent inward knee collapse.
Implications of Stride Data on Performance and Injury
Now that the phases of the hockey skating stride have been addressed, we can more thoroughly answer the questions about how to skate faster and avoid injury.
Assessing the performance and mechanics of each phase will not only highlight places skaters can become stronger, but ways to create sounder mechanics that reduce the overall risk of injury.
Reducing Injury Risk in Skating
Most land sports involve running. Ice skating is a completely different motor pattern.
Unlike running, which is essential to most land-based sports, hockey necessitates using the edges of skate blades for balance and power generation. During the hockey stride, the inside blade edge is most important to create friction on the ice and provide a surface to press from. Therefore, the hockey stride involves components of both linear motion forward and lateral (side-to-side) movement. Running, on the other hand, is done entirely linearly and any motion side-to-side is energy wasted.
Getting effective use of the inside edge is essential for power production and skating speed. Using the inside edge of the skate does, however, present a potential problem. To properly leverage the inside skate edge, skaters needs to turn their foot outwards. If a skater lacks strength and control of the ankle, knee, and hip joints, turning the skate outwards will result in leg collapse inwards.
The collapsing action places significant strain on vital structures in the leg, causing an increased risk of injury. Plus, this will rob the skater of energy storage and power, thus decreasing top end skating speed.
This is especially true for novice skaters or youth athletes, as their strength and control often lag in comparison to their hockey performance. Working on the foundational movement and training necessary to protect skaters and build a strong base can’t be stressed enough.
Muscle activation and strength training for the gluteal muscles is essential to optimal trunk, hip, knee, and ankle alignment during skating. Working from double leg training up to single gluteal training is also ideal to develop the single leg control necessary for skating propulsion.
Optimizing Skating Biomechanics for Speed
One of the keys to faster ice hockey skating is optimal skating biomechanics – we started to address this with each stride phase. Compiling the factors observed in faster skaters across all phases results in a lengthy list of optimization opportunities.
Altogether, faster skaters have:
- Increased stride length
- Increased stride width
- Increased hip flexion during initial contact, gliding, and initial propulsion
- Increased knee flexion during initial contact, gliding, and initial propulsion
- Faster acceleration from loading to triple extension
- Increased hip extension at terminal stride
- Increased knee extension at terminal stride
- Increased ankle plantarflexion at terminal stride
- Increased hip external rotation and hip abduction during loading
- More forward shin inclination at initial contact and loading
- Greater stride power and strength
Optimizing each phase of hockey skating will involve a specific program for strength and conditioning, lower leg alignment, power in plyometrics, and then on-ice training by a skating coach or edge specialist.
Many of the parameters above require significant strength of the quadriceps, gluteal muscles, adductors, and calf. Weakness in any of these areas will negatively affect leg alignment, power generation, and will increase injury risk.
Surprisingly, faster skaters and slower skaters have the same stride rate, meaning that they take the same number of strides per minute. The difference is that faster skaters produce more power per stride, allowing for faster skating speeds. Getting the most power out of every stride should be the key focus.
Training for Leg Strength and Power
Knowing that faster skating (and injury avoidance) requires a high amount of leg strength and power, it’s therefore essential to train for these attributes.
Coaches and trainers should design training plans that focus on building explosive power and muscular strength. Training plans should incorporate both single- and double-leg drills, though single leg drills should not be introduced before the skater has the baseline strength to stabilize on one leg.
Although pushing more weight with a leg press or leg extension is a sign of increased strength, acceleration is the key parameter for hockey skating speed. Utilizing plyometrics that involve muscle loading, energy storage, and energy release is a key exercise strategy for increasing skating speed.
In order to measure progress, periodic records should be taken, as well as an initial “baseline” record. Testing leg power is best done via long jump tests and vertical jump tests. An increase in jump height or jump length correlates with increased leg strength, power, and efficient timing in lower extremity triple extension.
Key Takeaways
There’s a lot of research remaining to be done around hockey biomechanics, but what we currently know falls in line with existing biomechanics knowledge – keep the joints of the leg in alignment, avoid knee collapse, and engage the large muscles groups in the hips and the legs to generate power.
Any hockey athlete can improve skating speed and reduce injury risk by optimizing strength, power, and biomechanics through the various stride phases. Using concrete video feedback and consistent strength testing metrics provide honest, unfailing feedback on progress and can help determine areas of weakness. By following a specific, hockey-focused strength and conditioning program, athletes can make significant improvements in their skating performance.

Interesting article. Any new revelations in the past three years since this was written?
Thanks